Dedicated Gateway
IntelliFend built a lightweight proxy (a dedicated gateway) that can be deployed next to your origin to forward request URLs and headers to the IntelliFend intelligent detection platform. The platform then asynchronously sends feedback to the dedicated gateway for blocking or header injection. Clustering and autoscaling capabilities ensure unparalleled reliability and performance.
The following procedure describes the high-level steps for setting up an integration:
-
Configure integration in IntelliFend Back Office
-
Point your traffic to the dedicated gateway hostname
-
Allow the dedicated gateway to forward requests to your origin
Step 1: Configure integration in IntelliFend Back Office
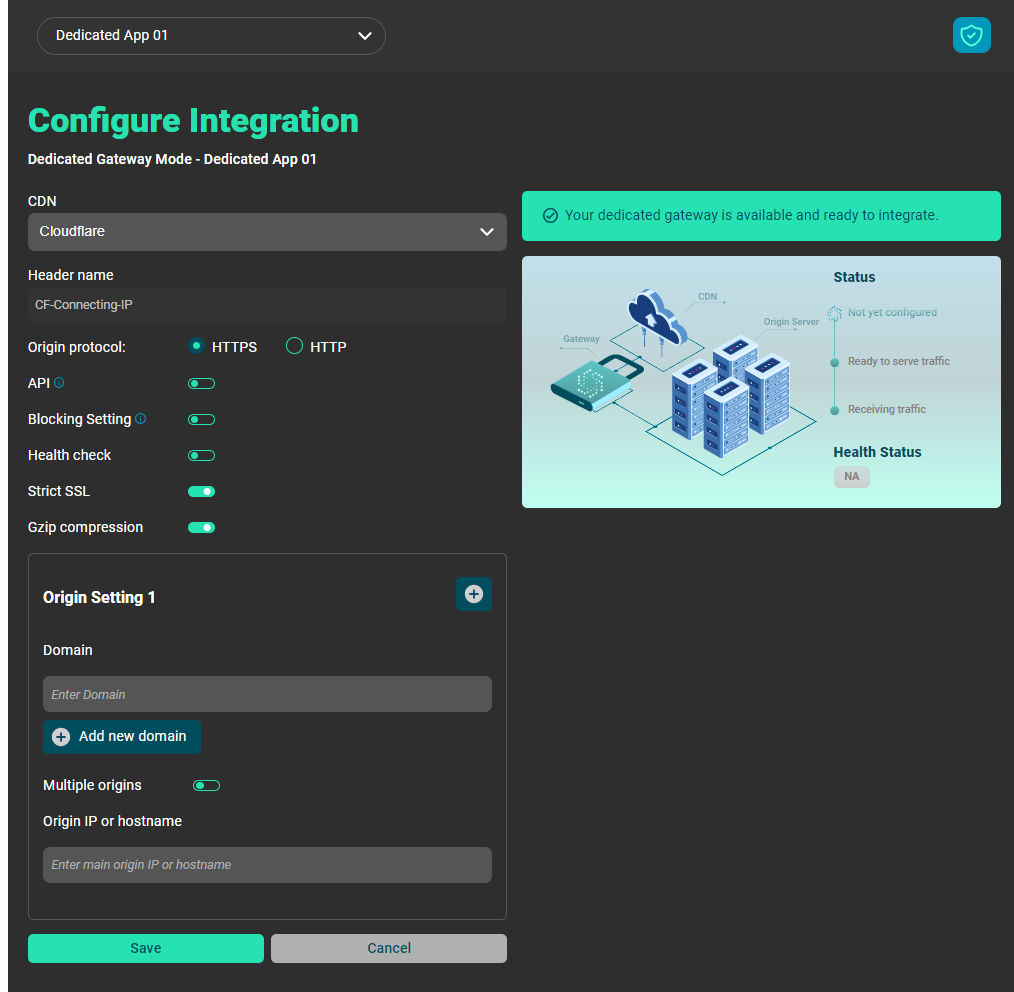
To create the integration between your applications and IntelliFend, follow the below steps:
-
Go to the IntelliFend Back Office page, and click Integration in the left navigation pane.
-
Click on the application name that you want to integrate. Please make sure that its integration mode is Dedicated Gateway.
If you do not have the desired application, you can contact us to create one.
- Provide your information in the integration form.
-
CDN: Choose the CDN service that is used in your application.
-
Header name: Specify the header name to get the real IP Address. If you select the available CDNs in the dropdown, the header name will be filled automatically. If you select the ‘Others’ option, you must provide the header name.
-
Origin protocol: Choose the protocol to communicate with your origin.
-
API: Enable if your application is served for API requests only. You need to provide the Parameter name of the API key to generate Visitor IDs for API requests.
-
Blocking Setting: Switch the toggle on to redirect blocked visitors to your designated URL after the specified delay time. Switch it off to keep blocked visitors on the IntelliFend default blocking page.
-
Health Check: Switch the toggle on to specify the health check path and the health check method. Switch the toggle off to let IntelliFend perform a health check on the main domain using the HEAD method.
-
Strict SSL: Switch the toggle on if your origin can handle SSL.
-
Gzip compression: Switch the toggle on if your application enables Gzip compression.
-
Origin Setting: Provide your origin settings. If your application has more than one origin setting, click the (+) button to add more.
- Domain: Enter your application domain.
- Multiple origins: Switch the toggle on if you want to configure multiple origins, and then choose a balancing mode.
- Failover: Choose this option if the first origin is considered the primary origin, and all the traffic will be sent to this origin. If the primary origin is down, traffic will be sent to one of the rest
- Performance: Choose this option to route traffic to the origin with the lowest latency between the dedicated gateway and your origin.
- Origin IP or hostname: Enter either your origin IP address or hostname. If you have multiple origins, you need to provide all their IP addresses or hostnames by clicking the Add new origin button.
- Review the information and click the Save button.

Step 2: Point your traffic to the dedicated gateway hostname
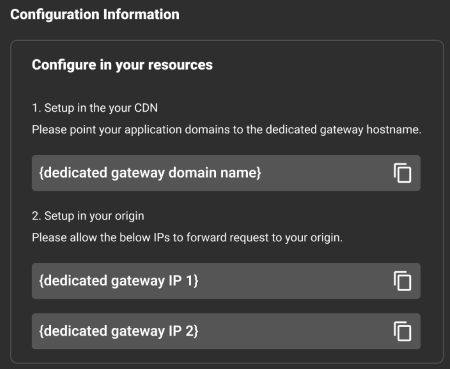
After successfully creating the integration in our Back Office, you must go to your CDN and then point your application traffic to the dedicated gateway hostname.
The dedicated gateway domain is displayed in the Integration Details page – Configure in your resources section, which is displayed after you save the integration successfully. You can access this page later by going to Integration in the left navigation pane, and clicking on the app name that you have configured the integration.

Step 3: Allow the dedicated gateway to forward requests to your origin
After successfully creating the integration in our Back Office, you must go to your origin and allow the dedicated gateway IP addresses to forward requests to your origin.
The Dedicated Gateway IP addresses are displayed in the Integration Details page – Configure in your resources section, which is displayed after you save the integration successfully. You can access this page later by going to Integration in the left navigation pane, and clicking on the app name that you have configured the integration.

To prevent your health check traffic from being flagged as bot activity. After successfully configuring the integration, you can append the Stealth ID parameter '_intellifend'—available on the Integration Details page—to your health check URL. Example: https://yoursite.com/?_intellifend=stealth_id